How to Convert HEIC to JPG on Mac
"Have you had to convert HEIC to JPG on Mac? How did you do it? "
HEIF is a High-Efficiency Image File format. It uses modern compression methods to retain a higher-quality image on your iPhone. When you take a photo with your iPhone, that particular photo is better compressed so that the file size is a lot smaller. But there would be demands for converting HEIC to JPG on your computer since JPG is the popular format used on computers.
Part 1: Something Needs to Know Before Converting
HEIC is also known as High-Efficiency Image Coding. You’re probably already using this particular format. HEIC is Apple’s file extension of the HEIF file format. This is a replacement for JPG, the file format for images. As we all know that JPG is a very old file format. The latest compression methods may not do so well with it.
HEIC files are only carried out by Apple phone users. It is the newest and latest file extension and format launched by the MPEG group. It’s important to note that a HEIC file is different from a JPG format. That means that older machines, using out-of-date software, won’t be able to open, read, or save in HEIC or HEIF format.
You might wonder why you have to convert HEIC to JPG on Mac. If you’re just keeping your photos on your Mac, you don't need to do it. However, you would have to convert HEIC to JPG if there’s a need for you to upload a photo online. Another reason why you would have to convert HEIC to JPG is that if you email the image, you surely want the recipient can open it. To be sure about it, it’s best to convert HEIC to JPG on Mac.
It’s worth noting that in the Photos app on your Mac, it won’t matter if the file extension is JPG or HEIC. You can still edit the photo in either format as long as you’re doing it on your Mac. The important thing about the HEIC file extension is that you get better compression that can help you save on space on your Mac.
Part 2: How to Convert HEIC to JPG on Mac
Using a tool can help you to convert photos easily and save time. Syncios Mobile Manager just supplies such a tool, HEIC Converter, which is provided as an assistant tool in the Toolbox of Syncios Mobile Manager.
☛ Convert HEIC photos using Syncios Mobile Manager
Syncios Mobile Manager is one of the most popular iPhone data management software worldwide, it not only helps you convert HEIC photos to JPG but also supports data transfer between your computer and iPhone including videos, messages, music, books, etc... Here are steps on how to use this excellent software:
Step 1 Download and install Syncios Mobile Manager.
Click the above button to download and install Syncios Mobile Manager program on your Mac.
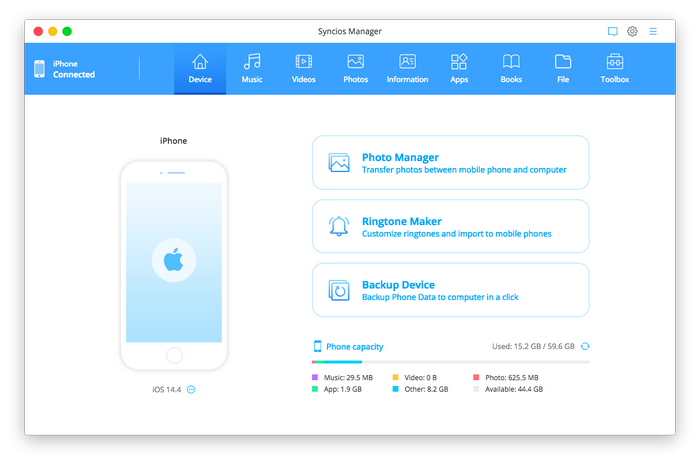
Once you have launched the Syncios Mobile Manager program, please connect your iPhone with your Mac computer.
Step 2 Choose photos you want to convert.
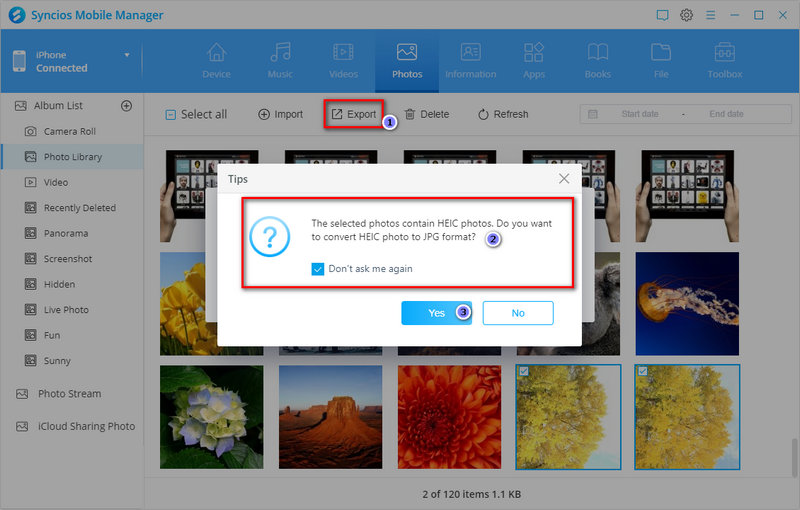
When your iPhone is connected successfully, click the Photos button to switch to the photo panel and you would see all photos on your iPhone. Choose the photos you want to convert and export, and click the Export button, then there will be a prompt that let you export the photos in JPG format. Click Yes and you will get photos in JPG format.
Step 3 Use the tool to convert in a batch.
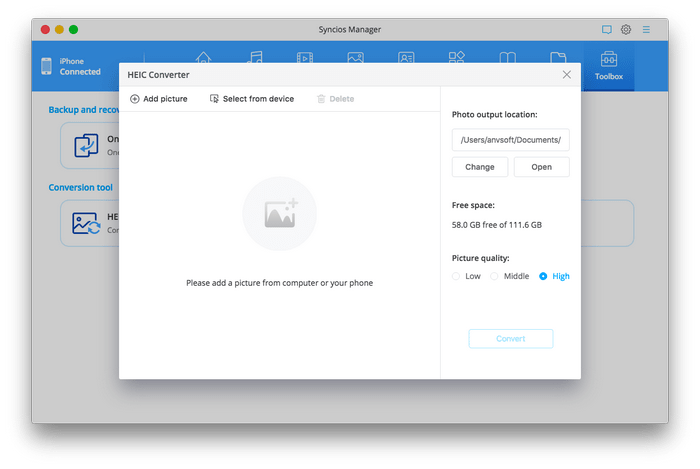
If you want to convert multiple HEIC photos to JPG at one time, you can use the "toolbox" which is provided by Syncios Mobile Manager. Click the Toolbox button and switch to the panel. You can see a tool name "HEIC Converter".
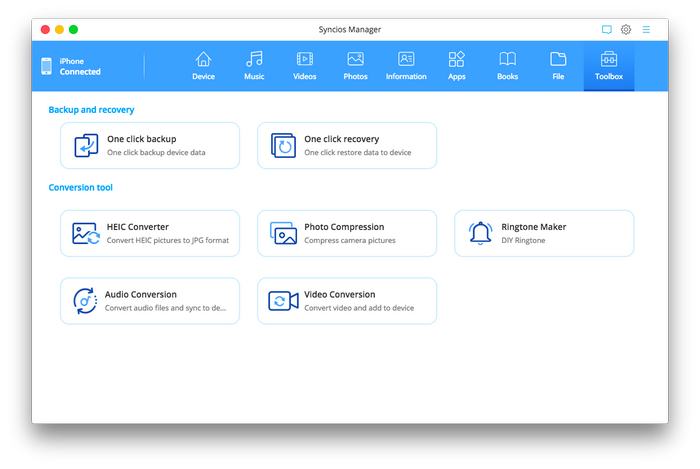
Click it and pick "Add picture". You can add multiple photos or a photo folder from your computer. Then set the output location and picture quality. At last, click the button Convert. You will get all photos converted to JPG format.
☛ Use Photoshop to Convert HEIC to JPG on Mac
- Open up Photoshop on your Mac.
- Click on the Create New button. You will see this on the left-hand side of your screen.
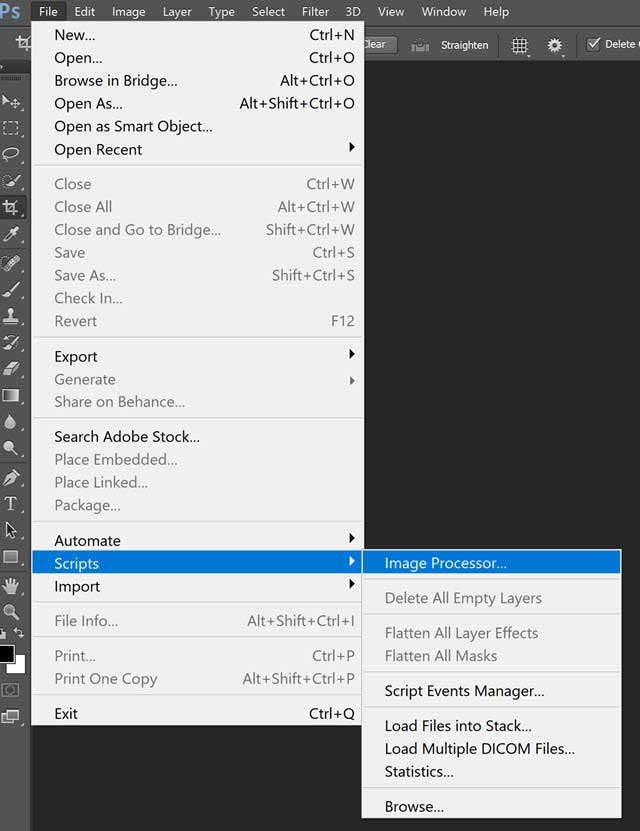
- Take your cursor to File on the menu above.
- Scroll down on the drop-down list and click on Scripts.
- Select the Image Processor.
- Select Folder on the Image Processor page.
- Click on Downloads and create a folder.
- Click on Save Location.
- Check Save as JPG on the File Type.
- Put in value in the Quality box. You can use the numbers 1 to 12, with 12 being maximum quality.
- Click on the Run button. You will see this button on the top, right-hand side of the Image Processor screen.
Conclusion
According to the above methods, it is not difficult to convert HEIC to JPG on Mac. As you can see, there are several ways to do it. And Syncios Mobile Manager is suitable for someone who wants to convert or edit hundreds of photos at the same time. Just download and try it!


Comments
Post a Comment