Apple has released iOS 14 (beta) recently, some iPhone users keep up with the newest hit on iPhone. While updating to the newest version of iOS, however, some people met some iOS problems and bugs. The iOS update also causes important data missing from their iPhone/iPad. If you updated your iPhone iPad to the latest iOS 14 and lost some important data, don’t worry, you can restore the data from your backup. Here are 3 easy methods to retrieve data from a backup on iOS 14 (iPhone/iPad).

 Method 1: Restore All Data from iTunes Backup After iOS 14 Update
Choice one: Erase all current data
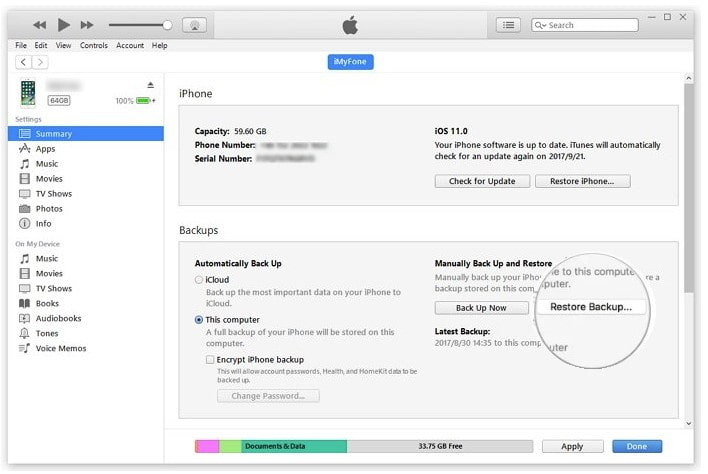
If you have performed a backup via iTunes, now you can restore all data back on your iOS device via iTunes too. It is the normal way we have done. Please note if you do a restore with iTunes, all current data on your iOS 14 will be removed from your device.
The steps are as the following:
- Step 1: Open iTunes on your computer.
- Step 2: Now connect the iPhone to the computer and enter the passcode when prompted or "Trust this Computer".
- Step 3: When the device appears in iTunes or the Finder window, select it to continue.
- Step 4: Click "Select Backup" and then choose the most relevant backup depending on the date.
- Step 5: Click "Restore" and then wait for the process to be completed. If the backup is encrypted, you may need to enter the password before you can restore it.
Choice two: Do not need to erase data (Recommend) 
If you do not want to erase the current data on your device, you can use a tool to help you restore the data, such as PanFone Data Transfer, which will not overwrite the existing data on your iOS 14. The restored files will merge with the existing data perfectly. And it allows you to preview details of all contents before performing a restore.
PanFone Data Transfer is a professional iOS Data Backup and Restore tool that makes things easier to back up all the iPhone/iPad data including contacts, photos, messages chats, call history, application, calendar and more from iPhone/iPad to the computer and then supports restoring the backed up data back to the iOS device. What's more, it also enables you to restore data from iTunes backup to the iPhone without replacing your current data. It can
- 1-Click to Back up Phone Data to Computer
- Retrieve Data from iTunes/iCloud/Local Backup to iOS or Android devices.
- Transfer Data Between Phones Selectively
- Sync Media Files And Playlists from iTunes Library to Computer and Device
- Supported file types include photos, DCIM, audio, video, contacts, SMS, call logs, WhatsApp messages, Ebook, notes, bookmarks, Safari history, voicemails, and apps.
- Cross-platform supported, compatible with Android 11 and the latest iOS 14.
Steps to restore data from iTunes without erasing current data
Step 1: Download and get PanFone Data Transfer installed on your computer.
Download
Win Version Download
Mac Version
Step 2: Start this program when the installation finishes. Connect the iPhone or iPad to the computer via a USB cable. As soon as you connect the device, please unlock the iOS device and choose "Trust" on iOS device. Any detection problem, please check this tutorial.
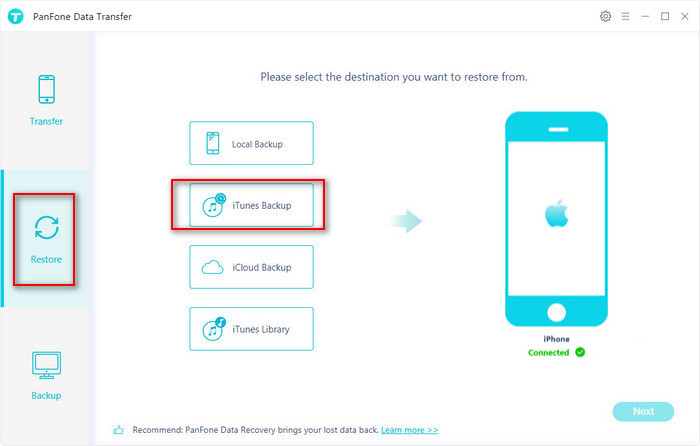
Step 3: Choose the iTunes Backup File.
Choose the "Restore" module on the program and click "iTunes backup". If you have synced with iOS device by using iTunes on this computer then PanFone Data Transfer is capable to detect the iTunes backup files. When you click the "Next" button, the program starts to load iTunes backup from your computer.
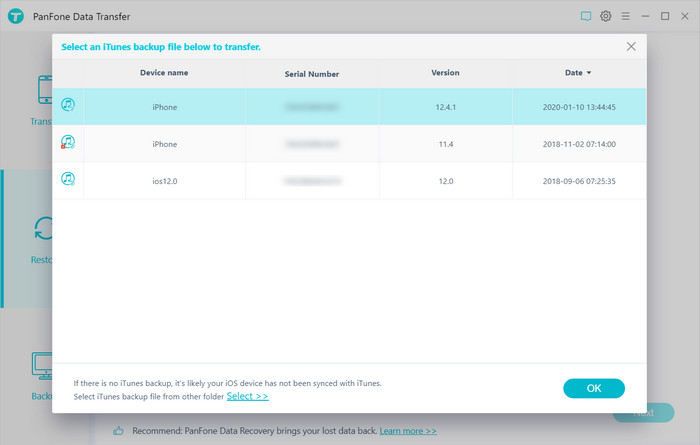
After that, all saved iTunes backups are enlisted. Choose one backup according to its backup date or backup size. Then click on Start.
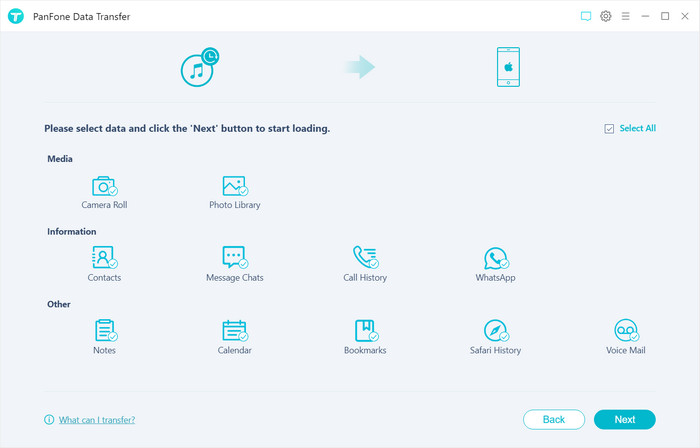
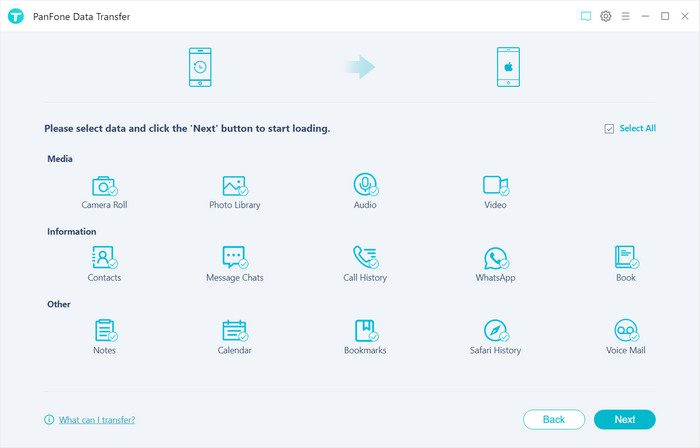
Step 4: Select the Desired Contents from iTunes Backup.
All contents from the backup file including camera roll, photo stream, app photos, app videos, contacts, messages, call history, WhatsApp, notes, calendar, reminders, Safari bookmark, voice memo, app document and more are available to restore. Just select contents you need then click on Next to load files. It takes a long time to scan a mass of data. Wait with patience during this period and do not disconnect your iPhone or iPad with the computer.
Step 5: Retrieve Files from iTunes Backup to iOS 14 Device.
Once the data is loaded completely, to retrieve the files, just choose the files you want then click "Recover to Computer" or "Recover to iOS 14 device" according to your need. You'll be notified that your device would reboot automatically after the process finished. Do not disconnect your phone until you see a prompt says that the restore is successful.
Method 2: Restore Data Selectively on iOS 14 from Local Backup
If you have not backed up the data, please go to the Extract Tip to make a backup at first. If you have had backed up the data locally on your computer with previous steps, now it easy to restore the data. Just follow the steps to restore the iPhone from a local backup.
Restore the local backup to iOS 14 easily by the following steps:
Step 1: Connect the iPhone to the computer and run this iPhone Data Restore tool.
Step 2: Choose "Restore" option and choose "Local Backup". Tap Next to continue.
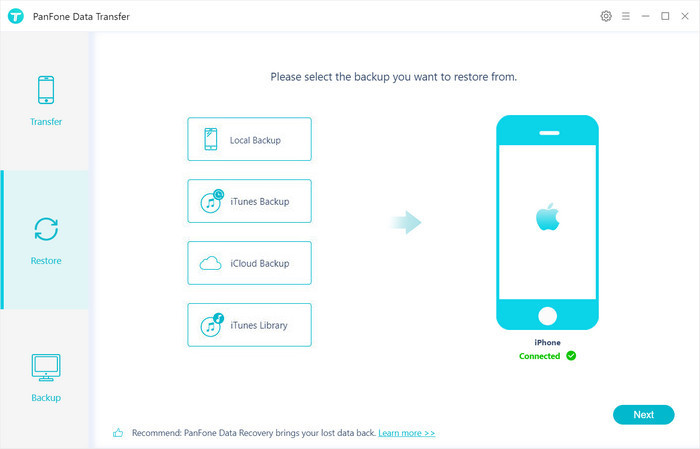
Step 3: Select the backup file to restore.
PanFone Data Transfer will display all backups you made previously. From there, you can select the backup file that you want and hit on "OK" to continue, then hit "Next" and select data to restore.
![]()
After a while, PanFone will restore all of the backed up data from the computer to your device.
Extra Tip: How to Backup iOS 14 Device to Computer
A lot of things can happen to your iPhone/iPad, which can cause your files to be erased or removed from your data-base. Though Apple devices are reliable when it comes to securing data, accidents can happen. Sometimes, a malware from an unknown application attacks your phone or you press the delete button by accident. You don’t have to worry if you have a backup copy of the files on your device. But if that’s not the case, you’re in for trouble and the only thing you can do is restore iPhone data.
So the backup will save us work a lot when you met such a condition of losing data. It is so important to do this work for period. The PanFone Data Transfer also helps you to back up the important data such as message, contacts, video, photos from iOS 14 to your computer, so you can restore the data without overwriting at any time you need by following the steps in Method 2. Below are the steps to do this.
Steps to back up iOS 14 data to computer:
Step 1: Download and install PanFone Data Transfer on your computer.
Step 2: Launch this program and connect your iOS device to the computer with a USB cable. Then PanFone would detect your iPhone/iPad automatically. If you encounter any detection problem during the process, please check the iOS tutorial to get help.
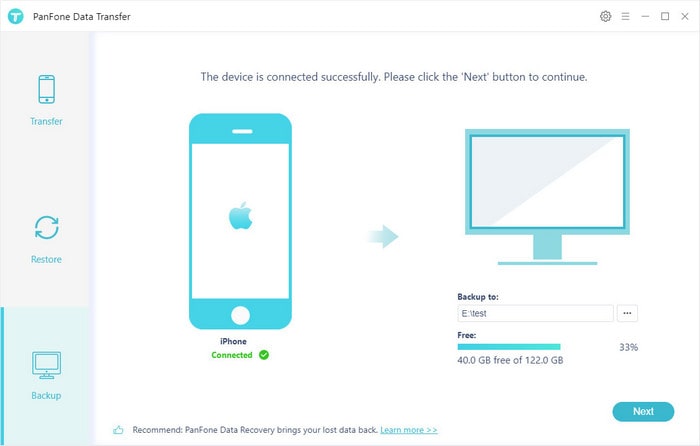
Step 3: Once your device is recognized successfully, simply go to the Backup mode and then hit on the Next button to move on.
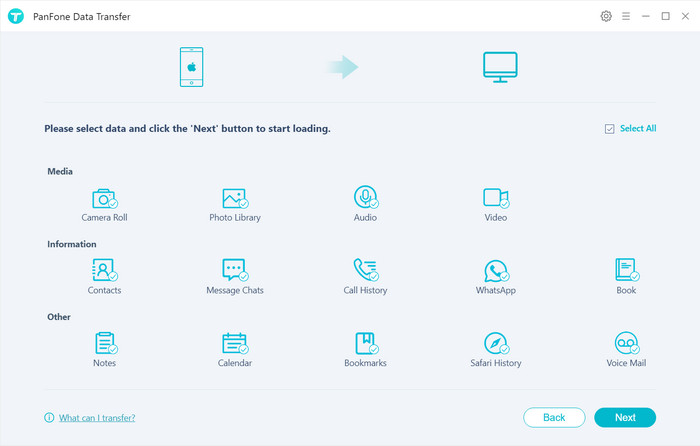
Step 4: You can uncheck the Select All option at first, then select the data you want to back up or just check "Select All" to back up all data. Click the Next button to start loading data. After the loading finished, click on Next to start transferring.
Wait for a while and keep your device connected until the process is completed. In the end, you will be notified when the process is done. You can view all of your data like messages, photos, videos, audios, and more on your computer.
Conclusion
Although you may lose the data during the upgrade, it is not difficult to find them back. The above 3 methods can help you to retrieve kinds of lost or missing data after the iOS 14 update. Please note that the first method -- restore from iTunes directly, which is common but since it will overwrite the current data on your device, so please be careful to apply it. We recommend using PanFone Data Transfer that will not overwrite your data. With PanFone Data Transfer, you can select and restore the data you want and furthermore, the restore will overwrite your current data. You also can use it to back up your data on iOS device now. You can download it and have a try!
Download
Win Version Download
Mac Version
Enable GingerCannot connect to Ginger Check your internet connection
or reload the browserDisable in this text fieldEditEdit in GingerEdit in Ginger


Comments
Post a Comment